-
👫[Spring] DI(Dependency Injection)의존성 주입 및 Annotation 사용Java 2021. 10. 7. 20:41728x90

➰Spring DI(with Annotation)
➰DI(Depndency Injection)
- 종속성 주입, 번역된 단어 자체가 어려우니 부품 조립으로 생각하는게 편하다.
1.Composition has a //직접 생성 class A { private B b; public A(){ b = new B(); } } 2. Assocation has a // 직접 생성하지 않음 class A { private B b; public void setB(B b){ this.b = b; } }- ✅일체형- 붙박인 형태로 사용자 입장에서 A라는 객체를 만들면 그 안에 부품을 잘 모름
A a = new A
- ✅조립형- 결합력이 훨씬 낮아지고 쉽게 부품을 갈아낄 수 있어 업데이트 할때 느슨하게 바꾸는게 더 선호하는 방식
B b = new B(); //부품(dependeny)
A a = nuw A();
a.setB(b); 주입 //(injection) b를 넣어주는 작업
조립형
- Setter Injection - 세터를 통해서 조립하는 방법
B b = new B(); A a = new A(); a.setB(b);- Construction Injection - 생성자를 이용한 조립방법
B b = new B(); A a = new A(b);
대리접에서 완성품을 살것이냐 조립형을 사서 조립할것이냐라고 생각을 하면 편하다. 조립품을 살때는 조립하는 것이 불편하지만 돈이 들더라도 조립해주는 서비스를 받는 것이다. 불편함을 덜 수 있고 시간을 아낄 수 있는데 이때 조립하는 역할을 Spring이 한다. Dependency를 Injection 해주는 역할을 Spring이 한다
이해를 돕기위한 예제
🚗Car 코드
public class Car{ private String carName private int Number }🙍♂️Person 코드
public lcass Person{ private int id; Car car; }위에 Car라는 객체와 그 Car객체를 가지는 Person 이라는 객체를 생성해준다
✅Car.xml 코드
<bean id="c" class="model.domain.Customer" scope="prototype">
    <property name="car" ref="car"/>
 </bean>
Car를 bean객체에 넣어주가 값을 주어 그 Car를 참조하는 Customer 형태의 c를 빈객체로 생성해준다.
✅Test.java 코드
public static void main(String\[\] args) {

    ApplicationContext context = new ClassPathXmlApplicationContext("playdata.xml");


    //step02
    Customer c1 = context.getBean("c",Customer.class);
    c1.setId(11);
    Customer c2 = context.getBean("c",Customer.class);
    c2.setId(22);
    Customer c3 = context.getBean("c",Customer.class);
    c3.setId(33);

    System.out.println(c1.getId() + " " + c1.getCar().getCarName());
    System.out.println(c2.getId() + " " + c2.getCar().getCarName());
    System.out.println(c3.getId() + " " + c2.getCar().getCarName());

}
값은 받은 차를 참조하는 Customer형태의 c를 이용하여 원하는 결과 값들을 뽑아준다.
결과
11 Avante
22 Avante
33 Avante
Annotation을 기반 설정 및 종류
1. pom.xml Namespaces 설정
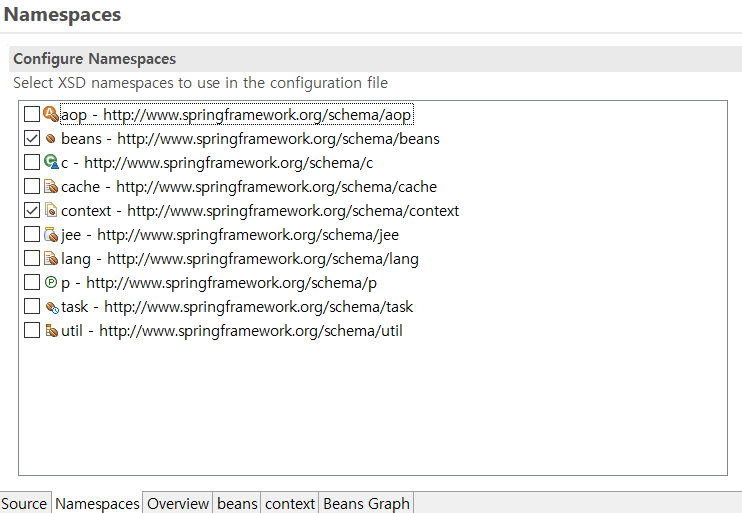
Namespaces 사진

beans와 context를 클릭해주어야 한다. 이후 작업에 필요한 것들은 pom.xml에서 추가적으로 space를 클릭하여 추가 시킬 수 있다.
2. xml파일
<?xml version="1.0" encoding="UTF-8"?>
<beans xmlns="http://www.springframework.org/schema/beans"
    xmlns:xsi="http://www.w3.org/2001/XMLSchema-instance"
    xmlns:context="http://www.springframework.org/schema/context"
    xsi:schemaLocation="http://www.springframework.org/schema/beans http://www.springframework.org/schema/beans/spring-beans.xsd
        http://www.springframework.org/schema/context http://www.springframework.org/schema/context/spring-context-4.3.xsd">

    <!-- 애노테이션 사용하겠다는 설정 -->
    <context:annotation-config />

    <!-- - 애노테이션 설정이 어떤 package 내에 내장되어 있는지 설정-->
    <context:component-scan base-package="model.domain" />


</beans>
Annotation을 사용하려면 xml파일에 애노테이션 사용하겠다는 <context:annotation-config,rhk>과 설정이 어떤 package 내에 내장되어 있는지 설정하는 <[context:component-scan base-package="model.domain"](context:component-scan base-package="model.domain")>문구를 넣어주어야 한다.
3. 종류 및 설명
@Component / @Component("id")
- 해당 애노테이션이 붙은 클래스를 스프링 빈으로 등록
- id값을 지정해주면 해당 id로 빈이 등록됨
- 클래스 이름에서 맨 앞 대문자만 소문자로 바꿔 id값 설정 (public class Car(){} -> Bean id="car")
@Scope
- 스프링 빈 생성 범위/개수 설정 (singleton or prototype)
@Autowired
- 변수/생성자/메소드에 다 설정 가능, 해당 타입에 맞는(byType) 스프링 빈 객체를 찾아 주입(의존 관계 설정)
@Resource
- @Autowired와 유사, 이름을 기준으로(byName) 스프링 빈 객체를 찾아 주입(의존 관계 설정)4. 적용예시
예시
- @Autowired와 유사, 이름을 기준으로(byName) 스프링 빈 객체를 찾아 주입(의존 관계 설정)4. 적용예시
@NoArgsConstructor @AllArgsConstructor @Getter @Setter @Component("c") //<bean id="c1" class="model.domain.Customer /> @Scope("prototype") public class Customer { private int id; //스프링빈 //애노테이션으로 Car라는 스프링빈을 자동 주입 @Autowired private Car car; @Override public String toString() { StringBuilder builder = new StringBuilder(); builder.append("Customer [id="); builder.append(id); builder.append(", car="); builder.append(car); builder.append("]"); return builder.toString(); } }'Java' 카테고리의 다른 글
[Spring]🍪Cookie &🍕 Session (0) 2021.10.09 [Spring] ➰URI Template (0) 2021.10.09 [Spring]MVC-with annotation🏨 (1) 2021.10.09 [Spring]💨 AOP(Aspect Oriented Programming)와 애노테이션(Annotation) (0) 2021.10.07